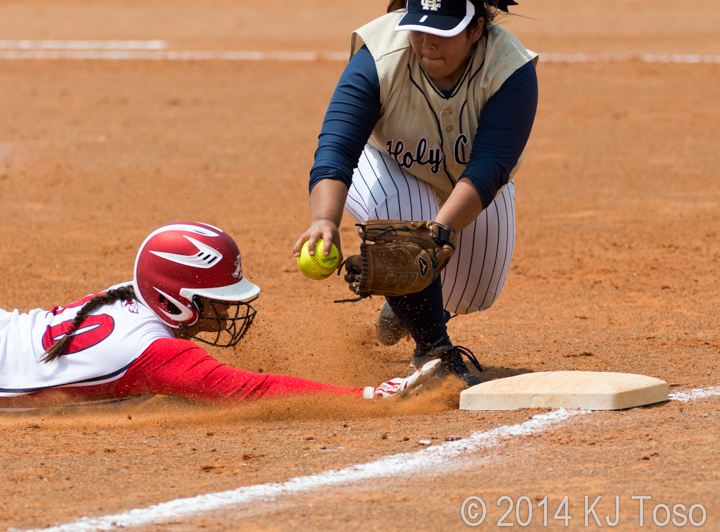
This was towards the end of the game and Boerne-Champion was very aggressive in running the bases. The short stop had to get over to cover third so the throw was late, but still captured a good shot. The expression on her face is great.

This was towards the end of the game and Boerne-Champion was very aggressive in running the bases. The short stop had to get over to cover third so the throw was late, but still captured a good shot. The expression on her face is great.
This was fun game to to shoot. First they let me shoot inside the fence. I basically camped out in the grass behind third base. I typically don’t get too many good infield shots from that position, but in this game, there just happened to be a lot of action at 3rd Base. This is one of my favorites from the game.
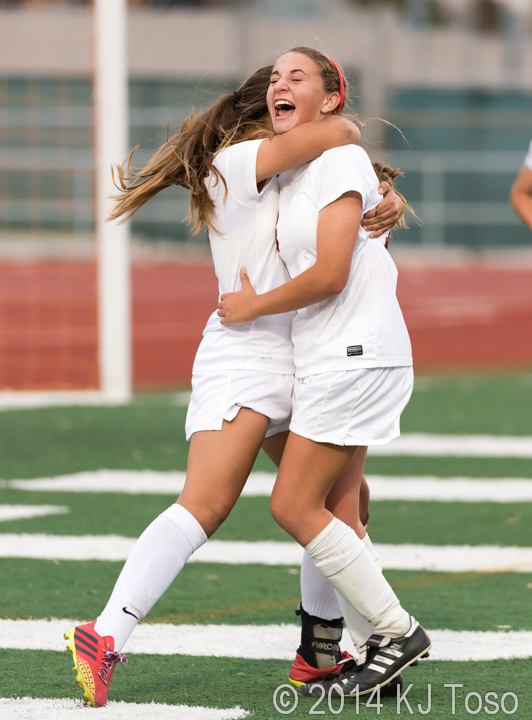
Didn’t get a chance to shoot this entire game because of traffic…actually just caught the last 10 minutes of the game. But was there to capture this great moment when Churchill went up 2-0 against Corpus Christi Carroll. Just love capturing happy moments like this.
A shot from the Brandeis and Reagan playoff match on 4 April 2014 at Farris Stadium, San Antonio. Classic NISD vs. NEISD soccer match. NISD teams still can’t catch NEISD, but they are getting closer every year. Reagan won this match 3-0.

One thing with what little spare time I have is act on the executive board for a local youth soccer club (Lonestar Soccer Club, San Antonio) which has grown from 64 players in the first year to now over 1,000 players ranging from ages 6 to 18. Over the past 7 years of building the club, I’ve honed my photography taking pictures of games and doing team/individual shots.
Once a year, we host a tournament as a club fundraiser and I’ve always struggled to get good team shots of the winners wearing their medals or holding up a trophy. Even if I was able to wiggle my way to be in front of parents to get the shot of a team, you will always get those one of two players looking at their parents instead of me, so getting that nice shot of the kids all looking at the camera was always a frustrating thing.
Today it’s even more difficult with every parent having a smart phone, iPad, or DSLR. They all want to get that shot so they can post it to the social media outlet of their choosing. Frustrating for tournament officials wanting to get a nice shot, but also it’s the parent’s right to get that shot since they pay the money.
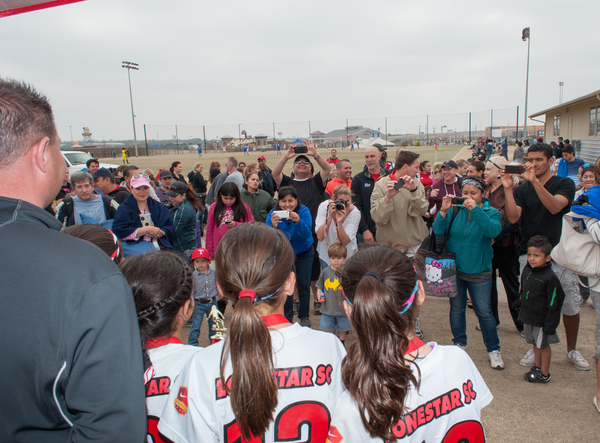
Yep, (above) this is what you fight against, but you don’t want to stop it either. It’s part of the fun of a tournament.
Now that we’ve grown into a major soccer club, our tournament has also grown and to keep it growing I really wanted to make sure I got some great shots of the winners. So, this year, I tried a new tactic.
First, when the first presentation was happening, I was taking some practice shots to make sure all the settings on my camera were set and ready to go. Once you get in front of the little ones, their attention span is short and won’t wait for you to adjust settings.
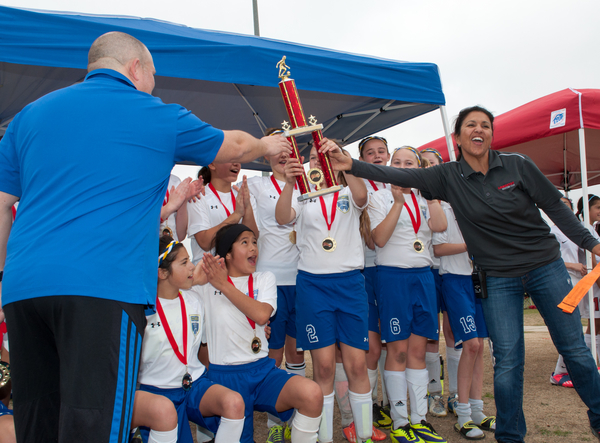
Once the team is assembled, our tournament director does the congratulations and hands out the medals and finally the team trophy. As soon as the trophy is given, I stepped in between the players and the parents, lifting both of my hands up an wide (one with my camera of course) and very loudly state, “parents, please let me get one good shot for the website first, then they will be all yours.” Then I turned to the kids, again with my arms open wide, and state, “Ladies…let me get the official picture first, so look at my camera and my camera only…this is one time you get to ignore your parents!”
At this time, there are still a couple kids looking at their parents, because the parents of course are getting in behind me to get the same shot. Still, I keep the kids attention by continuously saying, “my camera…my camera” until eventually they all look my way…then I get the shot.

How cute is that? You would never know there were 20 parents behind me with phones , DLSRs, and IPads trying to get the same picture. Someone looks at this and thinks I’m the only one taking the shot.
Finally, I had successful tournament trophy pictures! Here is what it took:
1. Be aggressive and in between the parents and players.
2. Let everyone know you are going to get the shot first.
3. Use the word “website” or “official” in describing the picture you’re going to take.
4. Let the parents know they will get their shot… “I’ll set them up for you, then they are all yours”
5. Have fun with the players and again, use the “official Champions photo”
6. Say continuously, “my camera, my camera…”
So there it is…not anything amazing or new for folks, but this was a story I thought I would share. Although a small success, it was a big jump in confidence as I venture more into the photography world. What I’m learning is a photographer has to have some leadership traits in able to step in and take control of the situation. You also have to be directive and when done in the right way and with confidence, you can get that shot.
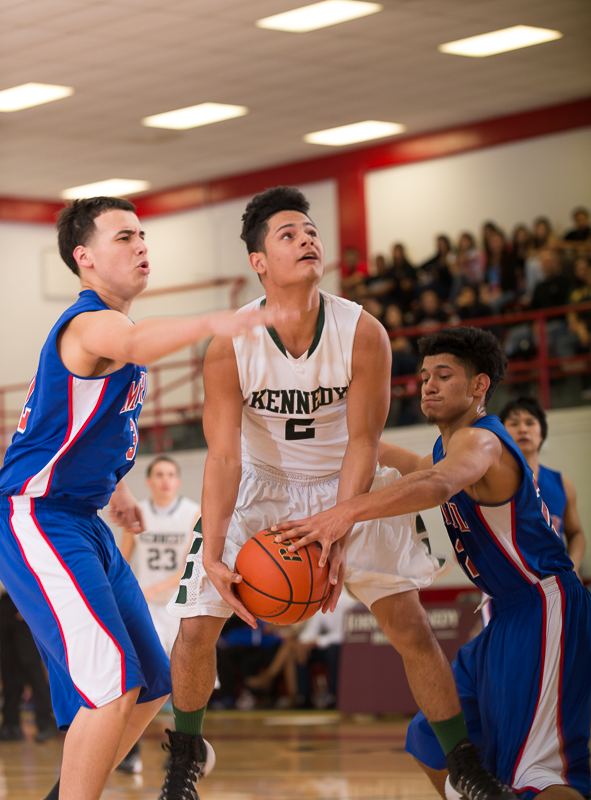
In looking to strobe my first basketball game, I did a lot of research on the web about setting up the lights, exposure, approaching game officials, etc… I didn’t find much that was updated in the last year or so. In fact, most of what I found was circa, 2005-2009. Maybe people don’t strobe as often, or the ones that do already know what they are doing. So with that, I thought I would document my first basketball lighting adventure for others to see and learn…or if you have comments, or suggestions for something better, that would be great as well.
THE PLANNING
Here is the gym. It’s the Edgewood ISD Gym on the south side of San Antonio. It’s old, poorly lit with an extremely low ceiling.

Old gym…but an immaculate gym. The game will be a rivalry game between Memorial and Kennedy. I contacted the Edgewood ISD athletic director and asked him if I could use strobes during this game and he said it wouldn’t be a problem. Some of the research I did stated I should get this permission and I also planned to inform the coaches and referees I’d be strobing as well, just so everyone knows what’s going on. There is a JV game before the varsity, so I knew I would have an entire game to get used to shooting with strobes and such.
I went to scout the gym to see where I could set up my lights. I initially thought I would use my 12′ light stands, setting them up in the corners by the exit doors (pictured above). The athletic director told me there is no crowd traffic there during games. My fear however was that although the stands would be out of the way of players, they wouldn’t be out of the way of an errant pass. Although I thought I could zip-tie them to the electrical conduit, I looked for other options.

The gym has an upper mezzanine where the stands are and figured if I could bracket the strobe on the railing (see above), it would be out of the way of any traffic, plus there is a convienent outlet on the wall, below the walk way.

Here is a shot from the top of the key looking back at the upper mezzanine railing (by the trash can) I planned on using. Just down the wall in front of the railing is an outlet, so I was hoping to mount the light there and simply run the power cord to that outlet…everything out of the way of any players or fans.
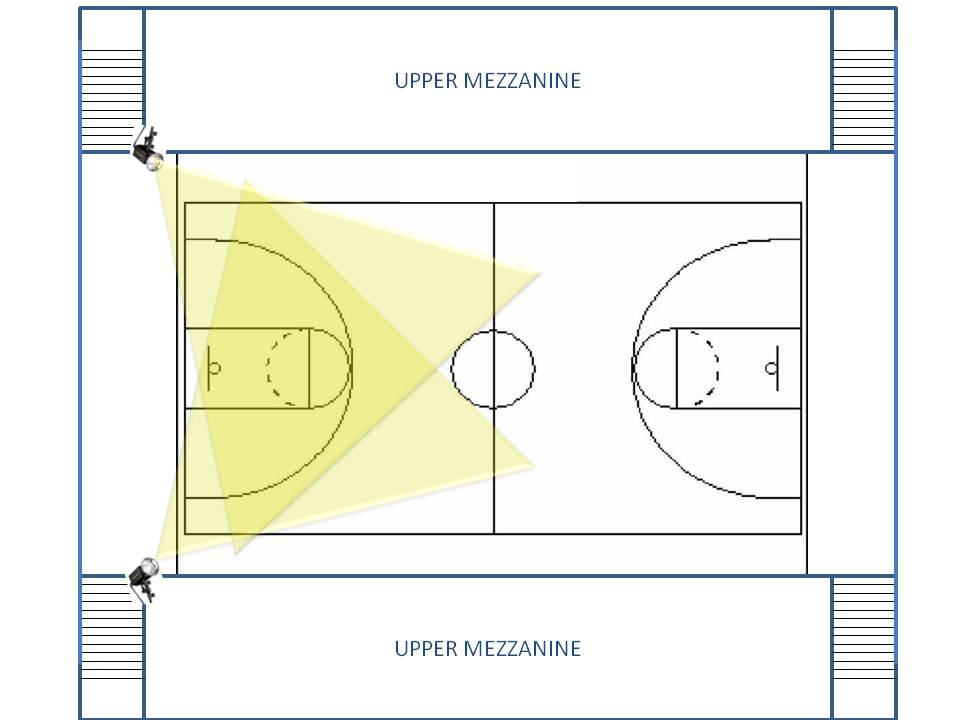 This is the diagram…I’m planned on aiming them at the top of the key, then up at a 45-degree angle.
I’ll be using my Interfit EXD400 monolights mounted by super clamps and remote triggering them with Pocket Wizards (Plus X); shooting from the baseline where there is plenty of room to shoot as long as there aren’t any cheerleaders there.
THE SET-UP
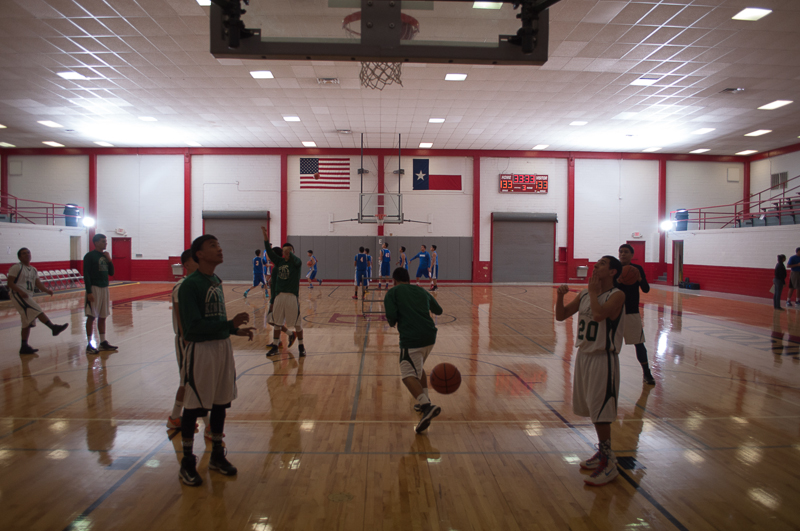
The JV game started at 5:00pm, so I showed up at 4:00pm to get set up just in case I ran into problems. Setup went better than expected. I had the lights mounted in about 15 minutes. I used a piece of rope simply to tie the mono light to the railing, just in case something happened and the light fell of the clamp. This mounting we clean and pretty easy.

Here is a shot from the opposite side of the court with the strobes going off.
Then I went on to set my exposure. I initially set the mono lights to 1/4 power, then played around with my camera settings during the shoot-around. This first shot was at 1/400, f/3.2, ISO 80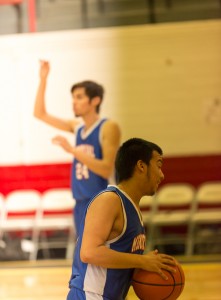 0. You can see the sync speed was obviously off.
I also didn’t like the white balance, so I switch to straight Kelvin setting of 5000, then set my shutter speed right to 1/200.
So, the next shot was better (below), but I still saw a bit of darkness on the right side of the image. I really wasn’t sure what it was. I tried a couple other shutter speeds thinking the sync speed with the mono light was off, but I always still had that darker edge on the image. But, when I shot landscape, the darkness went away.
So it was only when I shot in portrait is when I got the dark edge.
Once I removed the lens hood, the darkness on the right side went away…I have no explanation for that, so if anyone knows why that would happen, please let me know. shot portrait where I had the darkness on the right edge. So, I tried to remove the lens hood, as I usually leave it on just really to protect the lens when shooting so close to the action.
So, I’m done setting up the strobes, I messed with my exposure settings and settle on the following (1/200, f/4, ISO 640, WB 5000).
Total time to set all that up…35 minutes.
SHOOTING THE GAME
Prior to starting with the JV game, I spoke with both coaches and explained I was going to use strobes on one end of the court. I also told them that if any of their players complained about it, to please let me know and I’ll stop using them. Both coaches were OK with it. I looked for the refs to explain to them as well, but they were no where in sight until right before the game started…so it wasn’t a couple minutes into the game and one of the refs came up to me and asked that I turn them off. I explained to him I had permission from the AD and coaches, but he said, “the score keeper asked to have them turned off.”
So, I simply took my camera off the court and set it on top of my bag, then started checking my phone. While I’m doing this, the ref looked to speak with both the coaches and an administrator behind the score table. After a couple minutes, he gave me the thumbs-up to continue.
As I’m shooting, if found it much different than shooting straight ambient light. This is because you really need to shoot in single salvo mode to give the strobes time to regenerate power. Because you’re shooting single shots, focus became an issue. I had my camera on AF-C (I shoot a Nikon D600), so continuous AF mode. Yet, as I moved from player to player, I found the auto focus was not quick enough to focus before I shot. So, I tried to follow a player, rather than the ball. This helped, but still not great. When looking at the LCD screen, the images looked well exposed and focused, but I know from experience I wouldn’t really know until I got to look at them in full-resolution at home. So, I continued…
Once both games were complete, I began the tear-down. All-in-all, it took less than 15 minutes to break it all down and pack it.
POST PROCESSING
When I got home and looked at the images, I found my focus was off more than I thought. I needed to hold the focus on the player probably a split second longer to get the clean crisp focus. I would say 2/3 of my shots were not print worth (or Maxpreps worthy)…good for Facebook…yes, but not much more.
Here is good representation of what I was getting:
So you can see…it’s really close, but not really tack-sharp on the shooter’s face. This is me just moving too late and not keeping up with the action very well.
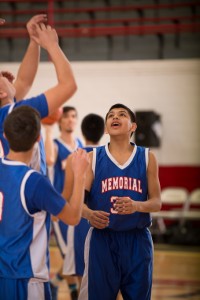
Here is one where I held focus on the player and ended up being a nice shot.

LESSONS LEARNED
1. Planning helped…going and scouting the gym before I shot it was crucial. I ended up knowing exactly what I wanted to do when I got there and was very prepared.
2. Let everyone know you are using strobes…The refs were OK with it once they spoke to the coaches, but if I was able to talk to them before them game, I could have avoided getting shut down for part of the 1st quarter.
3. Shooting Single Shots is Difficult…It’s a different kind of shooting as compared to ambient light where you can fire off 5-6 shots per second. If I get to do this again, I’ll focus on a single player, concentrating on keeping them in focus. Also, timing is crucial. Because I had shot so much basketball before this, my timing wasn’t awful, but it could have been better.
4. Guilt of using a strobe…something I need to get over. I spoke with one of the JV players before the varsity game and he said he was aware of the strobes, but they only bothered him when he was shooting before the game (I didn’t shoot any shots when players were in the act of shooting during the game). On layups, I would try to focus on the player and as soon as he let go of the ball, I would fire.
5. Strobing is useful…especially in a gym like this where I don’t think I would have been able to get any kind of good exposure without them. If I can get a way without using them, I’ll do it, but at least now, I know I can use them to cover shots in dark gyms.
Most of the time this past Fall, I’ve been shooting High School sporting events for Maxpreps.com. I think I’ve captured some great volleyball photos and some average football shots. Since I began using a DLSR to primarily shoot my daughter playing volleyball, I think I have that sport pretty well covered.
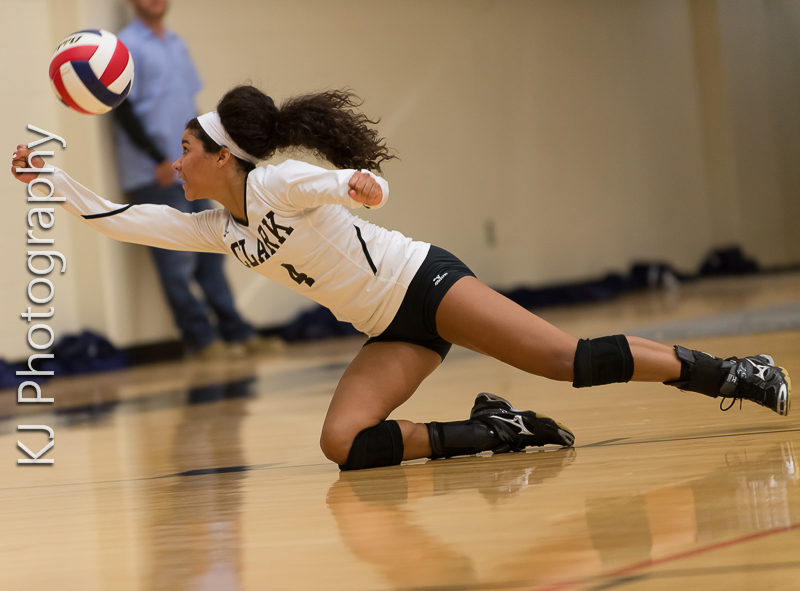 Now a days, I will try and push to get that just-right shot and what is my holy grail, a player diving and digging a ball via a pancake (flat hand between the floor and the ball). I’ve been close to getting that shot. I’ve either captured it, but was crazy blurry, or I have a clean shot, but the player missed the ball. So, I keep trying.
I will say I thought the income from posting almost 30 game galleries to Maxpreps would be significantly more than I’ve actually received. I found the players/parents tend to simply screen shot the photo from the Maxpreps site and use that, despite the Maxpreps watermark (as lame as it is). More to come about this.
One thing shooting for Maxpreps has done is provide access to parents and players at games where I talk about my photography and how I’m always looking for additional ways try different things, which in turn has prompted them to ask about senior portraits. I think at some point these types of relationships will lead to additional portrait opportunities and if that’s the case, then I need to work how to do that.
At work, an organization asked me to take photos at their upcoming Holiday Party (you have to call it that in the military so you don’t offend anyone by calling it a Christmas Party) and asked how much it would cost. Knowing I need to learn about portraits and lighting, I agreed to provide candid shots of the event for free as long as I can set up to take formal portraits, to which, they agreed.
So I purchased my first set of moonlights, which are the new Interfit EXD400 Softbox/Umbrella Kit I purchased from B&H Photo (wife not happy). They are coming in this weekend and so I’ve been reading up on lighting setup and styles. I can’t wait to play around with different lighting styles and techniques, of which I will use my daughter as a model. Then next week, I’m going to take portraits of a work mate’s family while his son is back in town after just completing his Army basic training. Not sure if I’ll use the lights or not, but looking forward to that.
So, what is the primary purpose of this entry? Not really sure, except I think each opportunity you have to shoot can lead to additional opportunities. Maxpreps gives me access to parents where I normally wouldn’t have that access. Work colleagues know my work as well which lead to additional opportunities.
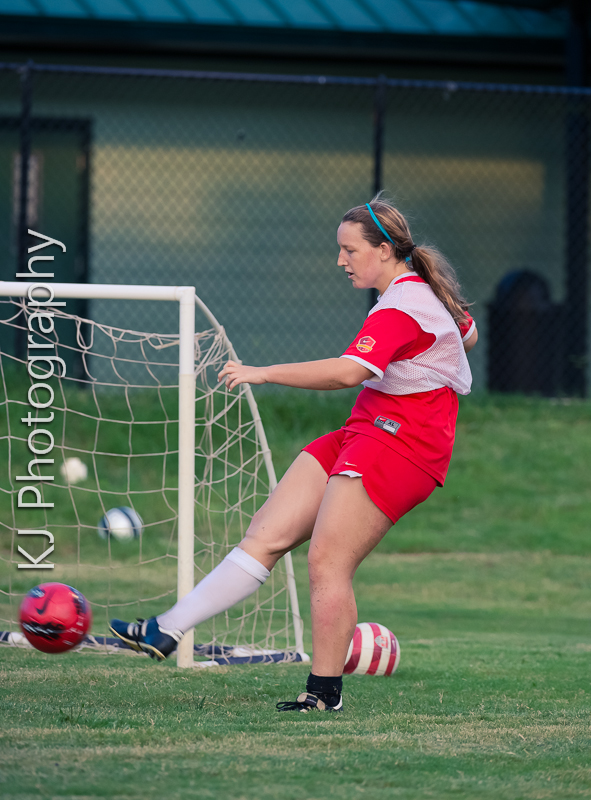
I started this photography thing to take nice action shots of my kids playing soccer and volleyball. That was probably 5 years ago and today I still can’t get enough of it. While at the games I would take shots of the entire team and share them with the parents. Now, I don’t do that as much. During high school season, I shoot for Maxpreps.com which has really made me a better photographer. Maxpreps demands you fill the frame with your subject and like the photos somewhat overexposed for my liking. But that’s OK because it has made me really dial in my camera because I find it easier if I get the exposure right before I get to post-processing. It’s hard to fill the frame on a big field sport such as soccer or baseball with a 70-200mm lens, so I got crazy and bought a Nikon 200-400mm f/4 and it’s awesome.
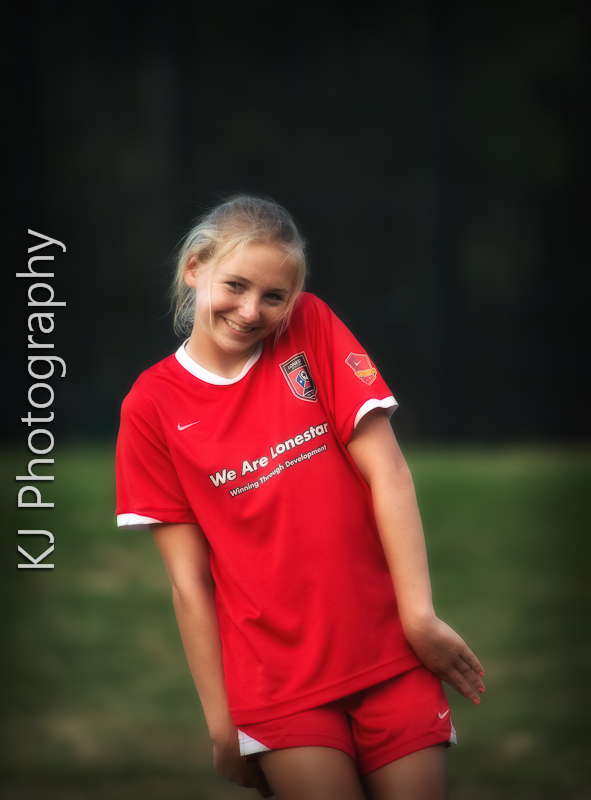
Nothing special about the photo above except it’s my daughter (she’s awesome) who couldn’t find a shin guard…that never ends at any age for you soccer parents out there with youngin’s
I took it out for a test drive yesterday and it’s “as advertised.” Although, I’ll really have to work on my technique because I’m zoomed in so much, it’s actually pretty difficult to follow the action and keep it in frame. I’m not a sprayer…at most, I take 3-4 frames at a time. I think it’s because of my Air Force training on the M-16 rifle. In full automatic mode on the M-16, you’re trained to take 3-4 controlled shots so you keep your aim stays true. I found that same technique works in sports photography as well.
During breaks, I do like to catch players goofing off and it’s amazing how teenage girls can spot a camera from 40 yards a way and give a pose just in case it’s actually pointed at them. The shot below is a prime example (I added some glowing effects just for fun).
At any rate, I still need more practice with this beast of a lens and hope to capture some great shots this coming season. I’m glad soccer season is starting.
In the first part of this post, I explained how my daughter signed me up to shoot a Quinceanera for one of her friends and how this something really outside my knowledge and comfort zone. I did a lot of research and found a photographer named Roy Hernandez in California who does amazing work, from which I got my motivation to begin. In the first part, I talked about going to my subject’s (Cheyenne) grandmother’s house for some initial shots, and then taking shots in harsh sun light. So, environmental factors made me have to think and really understand my equipment. Photography is much more than just buying expensive equipment. If you don’t have a basic fundamental understanding of exposure and how to quickly adjust your camera, you’re in a world of hurt…and I certainly was in this case.
In this second part of my Quinceanera shoot, I faced another harsh environmental factor, and that was the actual aesthetics of the church and dance hall. I had the actual street address of the church, and I had that entered into my phone’s Google Maps, but I’m a man and really only use that to get me in the general area. Once I’m in the general area, I use my man instincts to find where I’m going…and it usually works…not going to lie. However, in this case, I’m driving in the general area and looking for a church. I found a couple churches in the area, but no cars, no mom, nothing at any of them. So, I went back to the phone and actually pin-pointed the location, which turned into being an old strip mall, and the church was actually located in an old store.
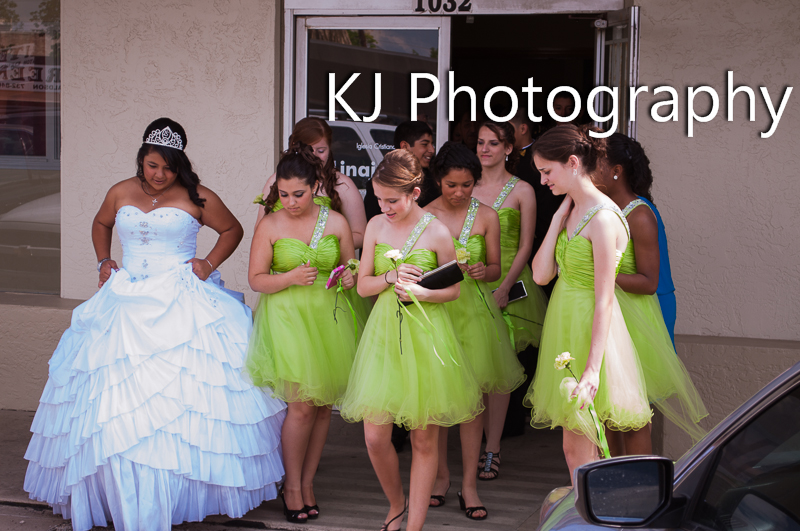
Inside the church was not better. There was nothing really resembling a church. There were standard banquet chairs and a big blue stage, with light/dark two-toned blue painted walls. Not the prettiest of backgrounds for a Quinceanera ceremony. (DSC-237) Her mom wanted me to get a good shot of each of the members of the court as they came up the isle when entering. Then shots of Cheyenne as she entered. I spoke with the Pastor and asked about any restrictions in taking photos during the ceremony. He said absolutely not and I was free to roam. With that, I began walking around trying to find a way to get shots of the kids while making the church look good. I was using my Nikon 18-55mm which was pretty much useless in this dimly lit church without a flash. I put on my Nikon SB-600 Speed Light and tried different power settings.
This helped, but as you can see on the left, although she has a wonderful smile, the photos I took of the kids were pretty ordinary.
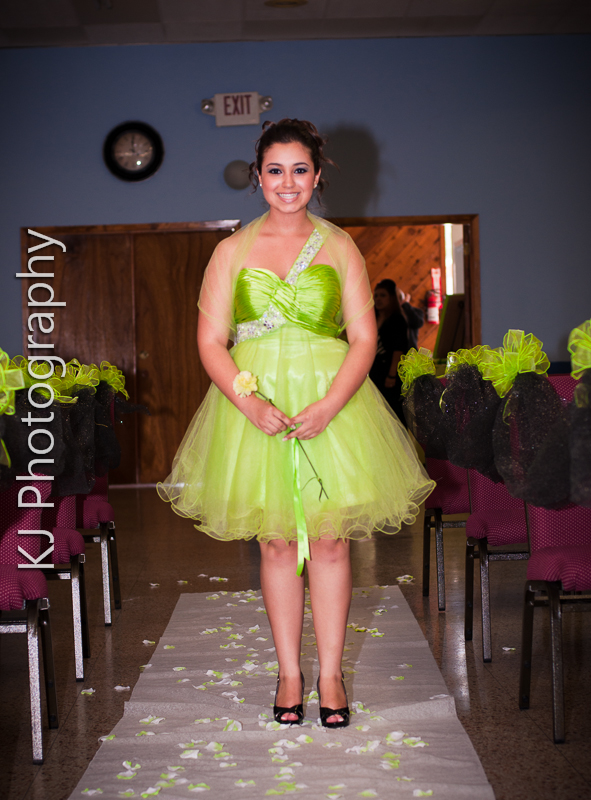
So, I went to my trusty Nikon 70-200mm f/2.8. Here, this lens really bailed me out because now I can get in close without getting into the middle of the ceremony. Additionally, by using a really shallow depth of view, I was able to bokah-out the ugly church settings and I think I captured some great shots.
Things didn’t get easier when I got to the dance hall. Low ceilings and very little light pushed me to become very close to my SB-600. Before this event, I honestly didn’t use my SB-600 much since I do much more outdoor sporting events. My wife bought me a really nice camera bag and it has AA-batter storage section which I always kept stocked because it was there…but man, I’m glad I did, because halfway through the dinner/dance portion, the batteries were gone in the SB-600. Lesson: Always have batteries with you whether you plan to use them or not.
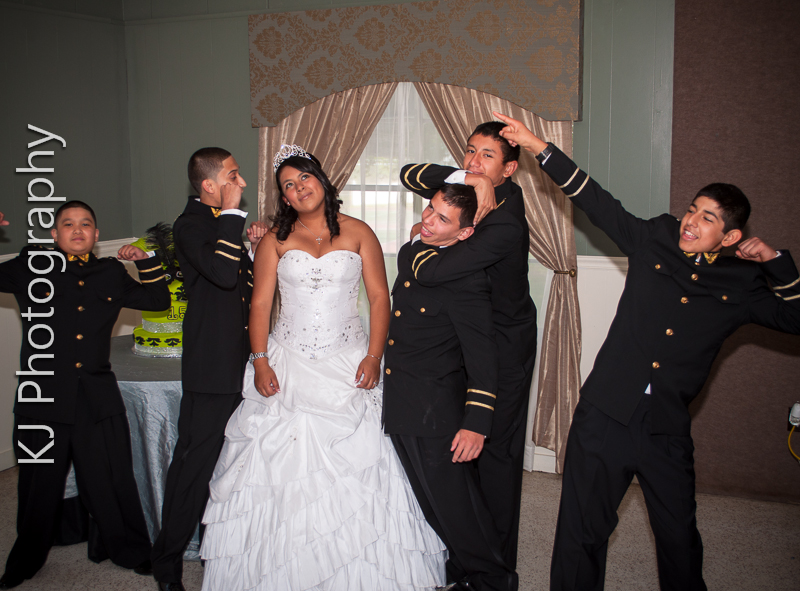
During the dinner and dance, I again relied primarily on my 70-200mm lens. I was able to hang out on the side next to the DJ and just capture the kids being kids.
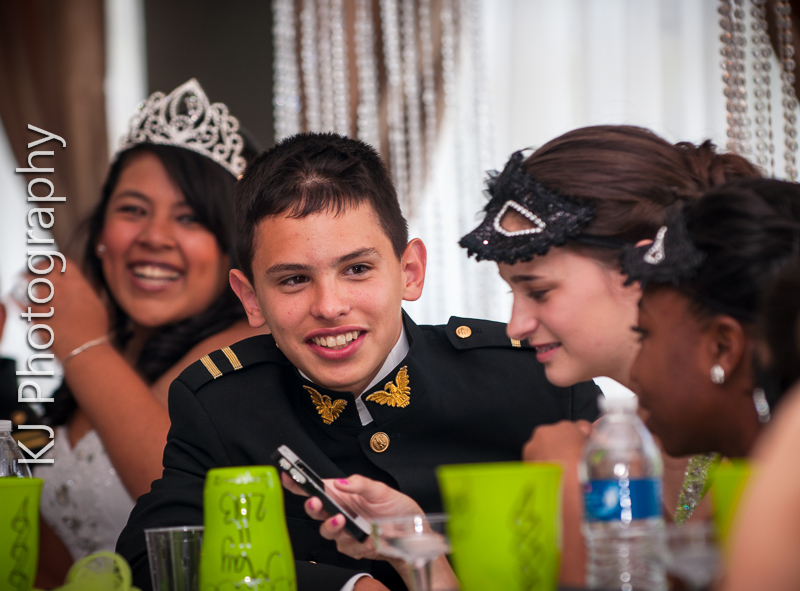
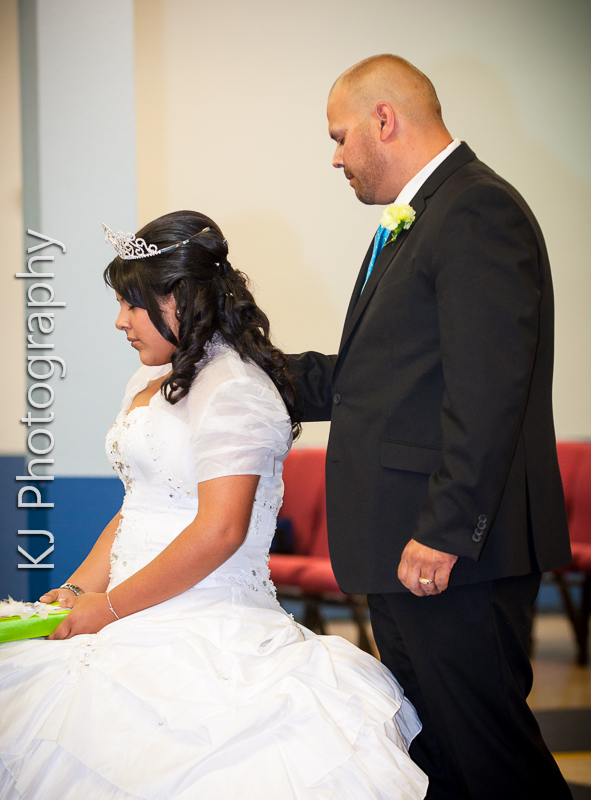
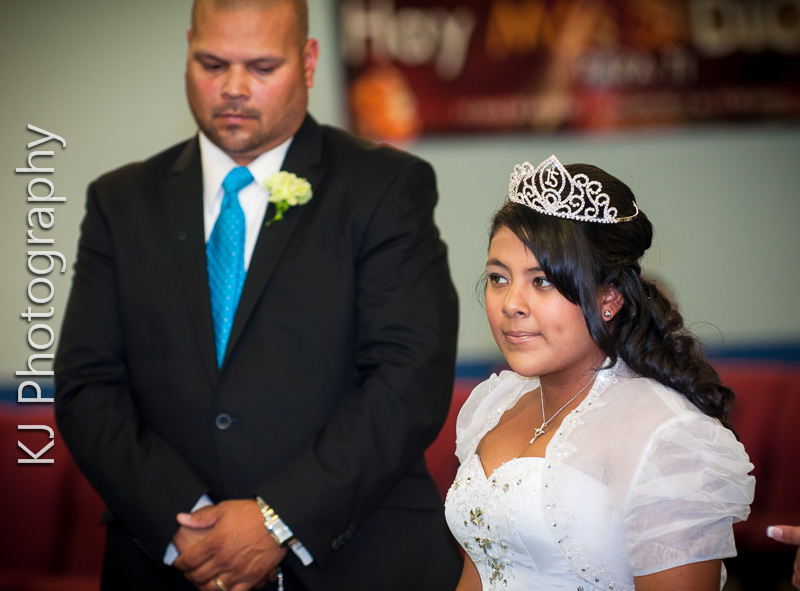
While always keeping an eye on Cheyenne to try and capture her in candid moments
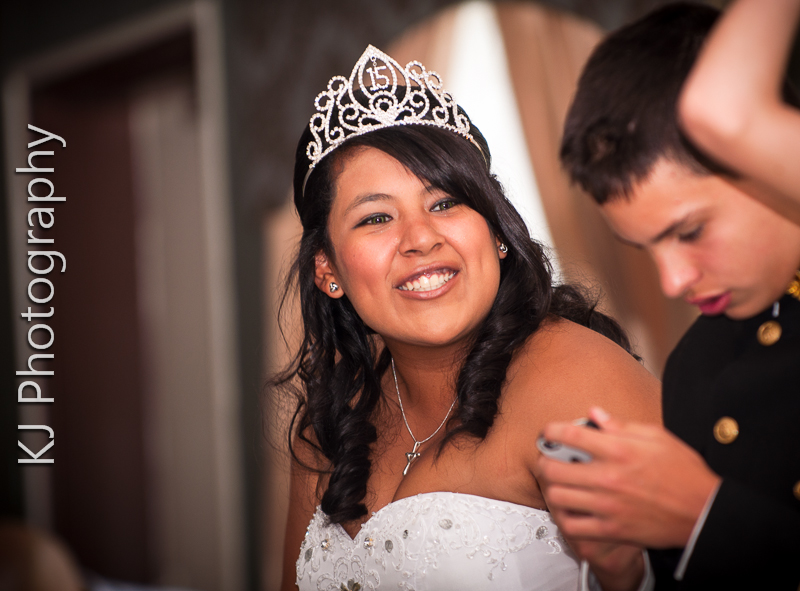
It was about this time I stopped worrying about the surroundings and just focused on capturing small moments which Cheyenne and her parents were probably too busy to see, or just capture the fun of their family and friends.
So you can see, I’m really a beginner and I really enjoyed the Quinceanera more than I thought I would. I worked this a total of about 10-hours in all, and I will say I probably learned more about photography in that 10-hours than I have in a long time. I proved that for me to get better and learn this art, I need to break out of my comfort zone every once in a while. It was challenging, educating, and just a lot of fun. I hope to do more in the future.
So, I shot my first Quinceanera last weekend (May 11, 2013) and I learned a lot. Since this blog is basically about a photographer learning this art, I thought I would share some things I learned.
How Did I Get Into This?

My daughter asked me one day what I would charge to take pictures of one of her friends Quinceanera. She said her friend’s (we’ll call her Cheyenne…because that’s her name) parents said professional photographers wanted to charge $500 just to show up. I thought that was pretty expensive and not really thinking, I told her I’d do it for $100. Little did I know she would text that to Cheyenne and next thing you know I’m set up to shoot a Quinceanera…something I’ve never done before and had no clue what to do. But this is all part of the learning process…right?
So I began searching the web to find out how to shoot this sweet 15 thing. I found lots of information about what pictures to take. These were mainly in a list-type format and although a bit helpful, not really without some examples. Then I stumbled across a photographer in Los Angeles by the name of Roy Hernandez. He has a lot of amazing photos posted of Quinceaneras, plus other things. His photos are amazing and you should check them out.
I noticed in his photo shoots (you can see all his proofs on his website) that he basically offered the following:

So, armed with the information I gathered from Mr. Hernandez’s website, I set off to my first Quince. I asked Cheyenne’s mom if they were interested in the pre-set shots, but they just didn’t have the time as it was a busy time for them. So, we set up a time for me to show at her Grandmother’s home to get some shots before she got ready. I thought when I showed up, Cheyenne would be apprehensive about some stranger taking pictures, but after a quick introduction and idle chit-chat, she actually was very excited and open to taking any shot I was trying to do. I found this session more relaxing than I thought it would be, because other than my daughters, she was the first person I took shots of in a straight up photo shoot. I was pleased with they way they came out.
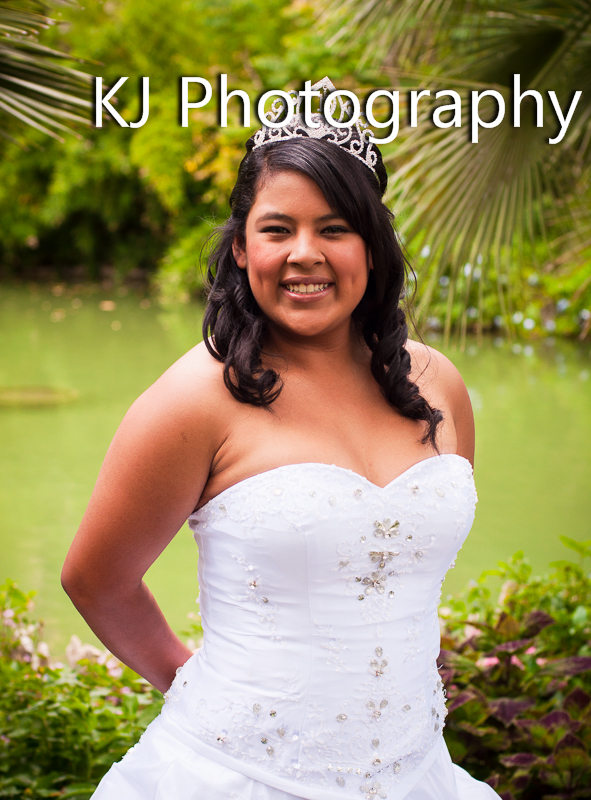
We went to the Chinese Tea Garden in San Antonio to take shots because it’s a pretty amazing place to take pictures with a lot of amazing backgrounds. I figured that would be a good place because even if I goof up the shot, the family will at least have a nicebackground. I didn’t pick a good time, as it was 1:00pm, very sunny and hot. So, a lot of harsh light which isn’t smart. I’ve read a lot about how bad it is to take pictures in the middle of the day in harsh light…now, that I’ve experienced it, I won’t make that mistake again. Even with the harsh light, I think the photos came out well (after some post processing of course). I also moved her into some shade and that’s where I think I got the best photos.
This got me on the right track for my first Quinceanera. I had gotten over the initial nervousness of shooting someone I just met, and just started having fun with it. Here are some lessons learned from this part:
1. I need to get better at posing and communicating. I found Cheyenne was in a constant state of smiling which caused some of the shots to look artificial. I think that was because I was not communicating with her and she wasn’t sure if I was taking a picture or not. Constant communication is key and something I need to work on.
2. Shooting in the middle of the day is not a good idea. Luckily there were areas at the Tea Garden that were completely shaded and so I was able to get some really nice shots. The ones in the harsh sunlight…not so much. If I had to shoot in the middle of the day again, I will definitely bring someone to help and hold a big umbrella or something like that to block the direct sunlight.
3. I need to know my camera better. Although I scoped the Tea Garden out and planned my shots, people getting in the way was an issue and we were crunched on time. So, those two issues alone caused me to have to change posing locations and my camera settings often to get the right exposure. I thought I knew my camera, but I found myself pulling away from the camera to see what the settings were and fumbling with buttons. I need to be able to quickly change my settings while still communicating with my subject to keep her engaged. This is something I’ll be working on.
All in all, this first part went pretty well and I learned a lot. The second part of this post will discuss shots at the church and reception. Very difficult and harsh conditions which I was not prepared for. I had to learn on the fly and I think I did pretty well for a first-timer.